Urbanite Tries Hemp Farming: A Guide to Starting a Backyard Hemp Farm
What exactly does one say to their wife as they are on the cusp of turning their backyard into a hemp farm?
What I should have said, “Hi beautiful, here is a new diamond wedding band, $2,000 to spend on whatever clothes you want, and 8 bottles of champagne for you and your girlfriends.”
What I actually said, “Hey babe, just a reminder, today I’m going to completely tear up our backyard [on the edge of downtown Nashville] in order to grow industrial hemp.” Looking back on it, I should’ve just bit the bullet and went with the first option.
Taking my backyard and turning it into a thriving hemp farm sounded like a good idea. As an entrepreneur, I’ve always done things differently. Usually, though, it’s trying my luck in the business world. From building an organization through direct sales, starting an online supplement store, selling novelty hats online, and eventually co-founding, Third Coast Health.
As I reflect back on it, I’m not 100% clear on why I had this brilliant idea to grow industrial hemp. Anyone that knows me would say with complete accuracy that I am not a physical laborer. I’m what you would know as a metrosexual. I have never been confused for a rugged manly man.
Sure, I’ll work my butt off for a sport, any competition, or to build a business; but I’d rather vacuum the floors and do the dishes then hang a picture frame, fix a clogged sink, or change the oil in a car. Maybe it was the business opportunity that compelled me to farm industrial hemp in my backyard.

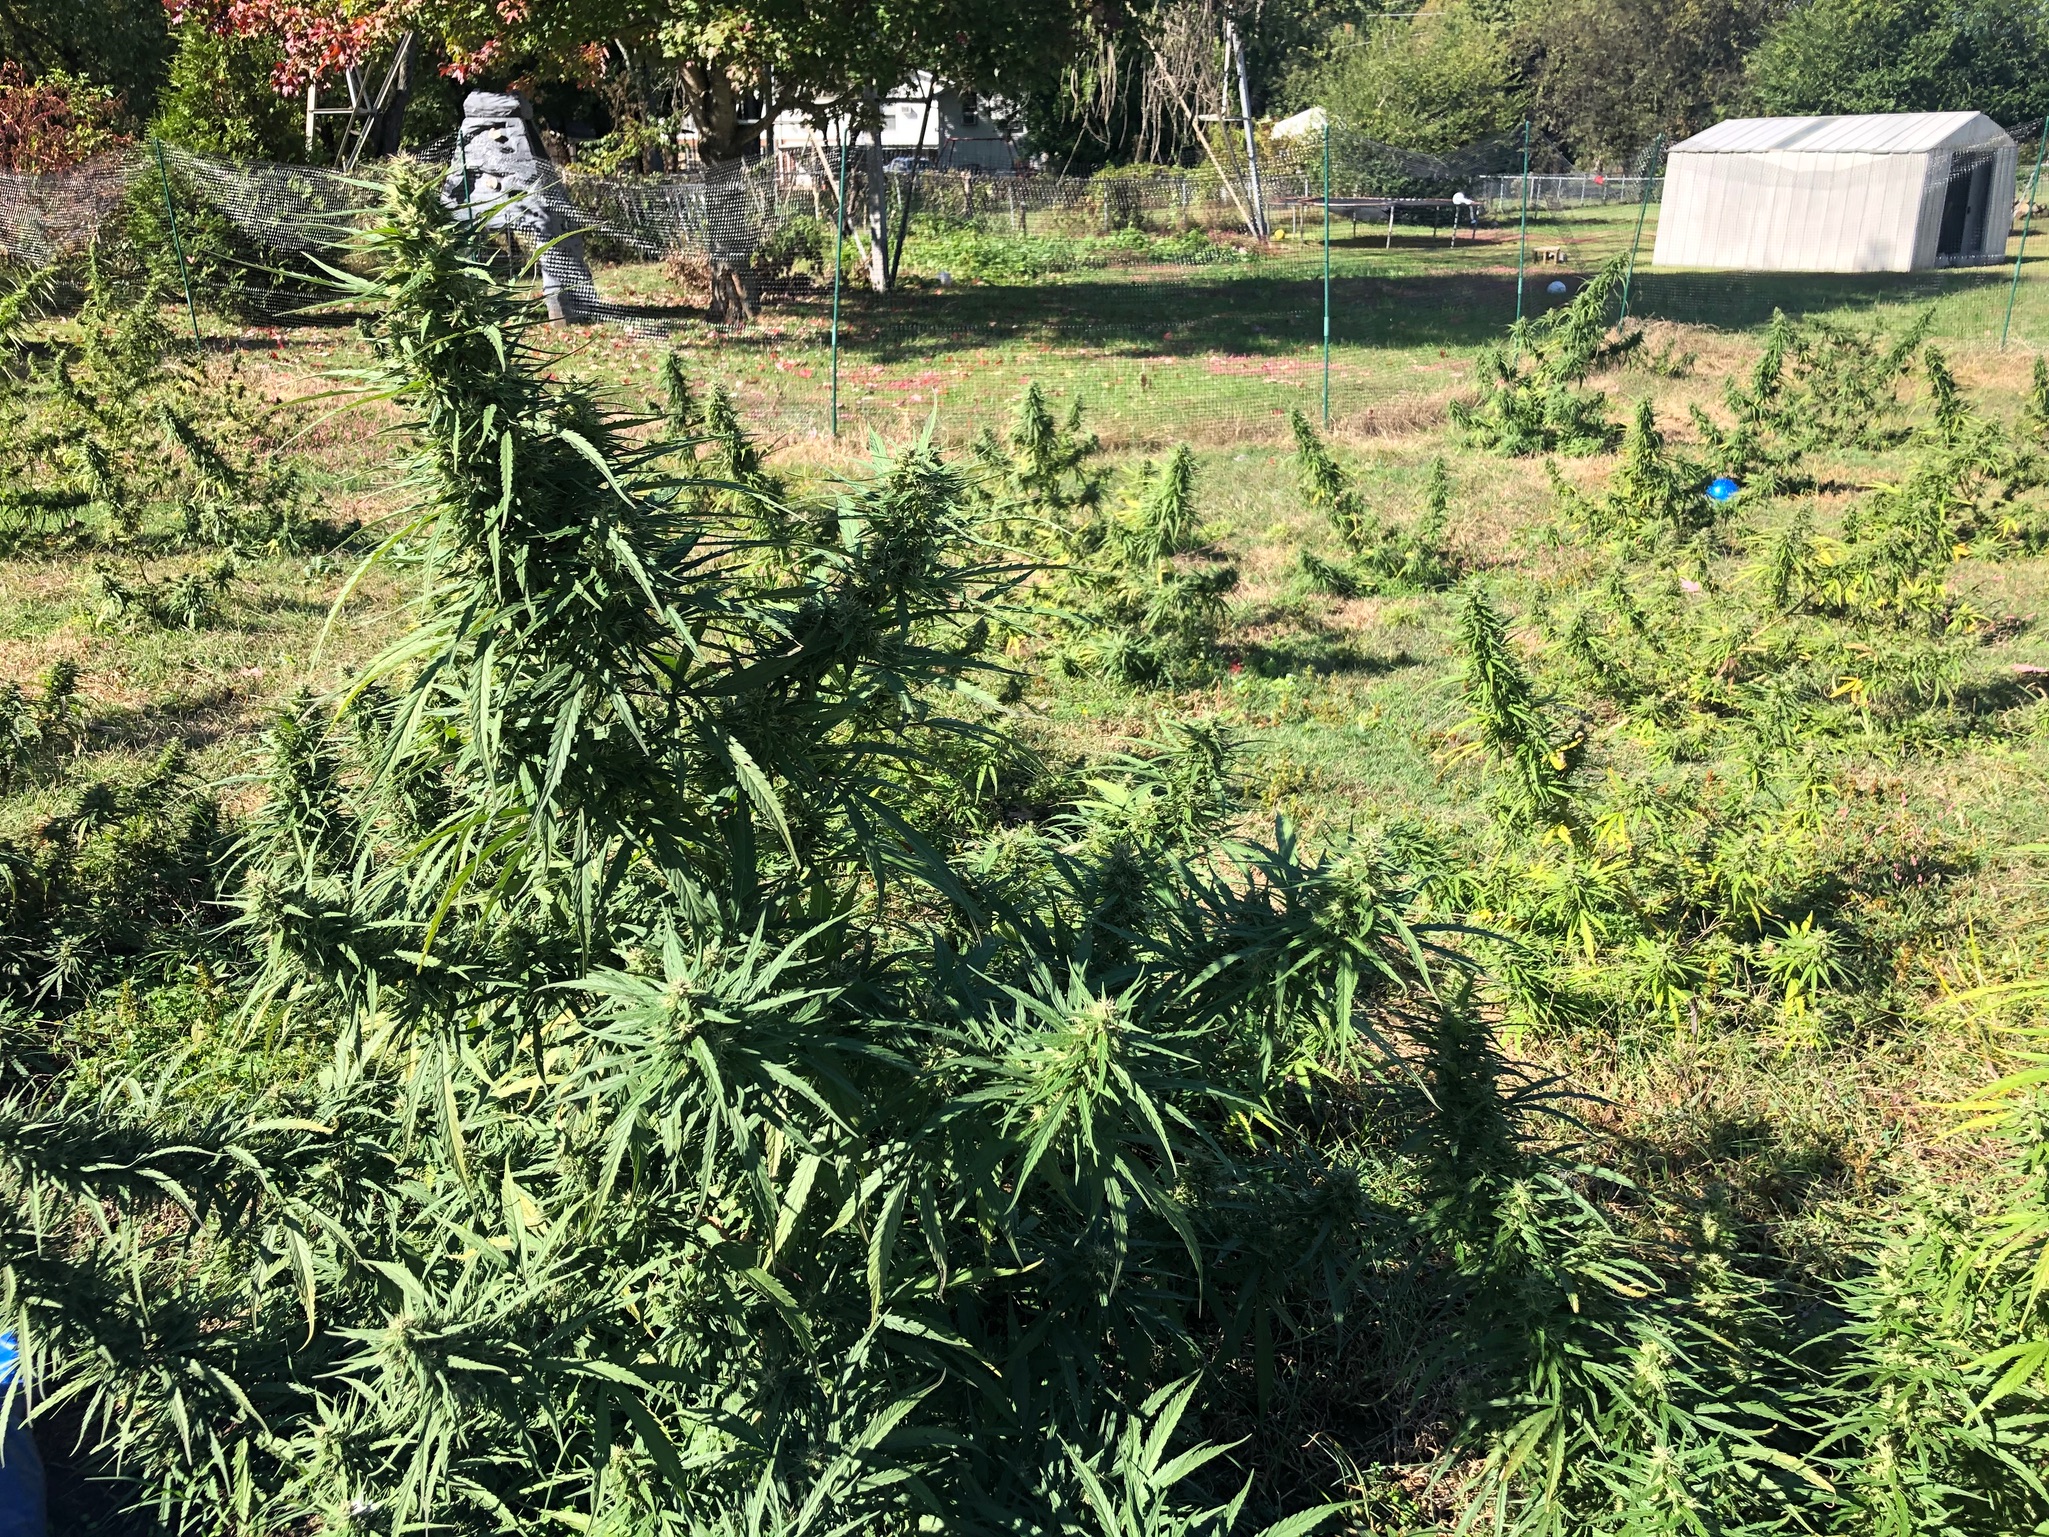
This is what my backyard looked like before I started hemp farming
What Got Me Started with Hemp Farming
At the time (Spring 2019), CBD biomass was selling for roughly $3 per CBD percentage per pound. That meant a 1 pound of 20% CBD extraction would have a wholesale value of $60. Currently, ACS Laboratory states on their website that according to a Hemp Benchmarks report, that prices dropped significantly to $2.32 in October 2019 and is selling at $1.31 as of the latest report in January 2020, representing a 67% decrease overall.
Simultaneously, dried CBD flower was selling at $349 per pound wholesale. The average plant would produce between 1-3 pounds. Cha-ching, I thought!
Dollar signs were on my mind. Yes, I’m passionate about helping people. All good entrepreneurs create solutions for problems people either know they have or realize they have once they learn about your business. But, I saw an opportunity. Enough opportunity that I didn’t want to wait. I wanted to be an early adopter. A first to market, without investing millions of dollars.
That’s where my backyard comes into play. I live about 15 minutes from the iconic Lower Broadway of Nashville, TN. (I’m from Grand Rapids, Michigan originally, thus the reason for this Third Coast brand. I’m the odd member out here in TN.)
I’m close enough to enjoy the amenities of our “It City” but still able to enjoy a modest parcel of flat land.
My neighbor two houses down from me was our City Councilwoman (she stepped down in the fall of 2019). It’s here, on the edge of the Nashville sprawl, with my limited agriculture background that I staked my claim at being today’s version of a 49er, those that headed out west to strike it rich in gold. I wasn’t going to dig for gold, but I was certain that I was going to plant riches.
My goal is to help any of you that are considering growing your own hemp. Where do you begin if you want to plant your own industrial hemp? What are some of the pitfalls or hurdles to avoid?
How do I even begin to grow hemp? I’ll do my best to answer that as well.
I’ll share my step by step approach I took to take my backyard and turn it into a hemp farm.
Where Exactly Should you Grow Your Hemp?
This is the million-dollar question. Where do I grow? Most of us don’t live in Rural America with thousands of acres of flat land ready to be turned into our miniature hemp Garden of Eden. That’s okay! To grow hemp it will require a few things when it comes to land.
- Number one is an abundant amount of sunshine. As much as possible.
- Number two, flat land (or gently sloped) that is filled with nutrient-rich soil. You also want to minimize the chemicals that were in that soil because hemp is a bioaccumulator and thus absorbs most things from the soil.
Meaning if your soil was once a toxic waste field, don’t be surprised if your hemp helps clean the soil, but in that process, it will bring that toxic waste into its fibers and structure. Just as important as sunlight, is access to water. Your plants will need plenty of water.
There is a myth that since hemp is often referred to as a weed, that it requires very little water. However, top farmers today are finding that hemp actually does need a decent amount of water to make sure that it does not spike in THC levels and to also maximize yield (your harvested crop).
I ended up growing my hemp in my backyard. In the beginning my wife thought I was just messing around and joking until that day I brought the tiller home. More on that later. I have a modest quarter acre. I do have a big maple tree that will block some of the sunlight from time to time, but for the most part, it’s straight direct sunlight for most of the summer months.
What to Know Before Growing Hemp
After picking out the land, it’s time to explore what options you have for growing hemp in your state. I’m going to encourage you to check with your local government to find out what is and is not eligible for growing Industrial Hemp in your local area as it’s different across the country.
Here is a link to the Tennessee government website that will help anybody who is looking to grow in Tennessee. However, your state government should have some guidance on what they allow as well.
After becoming compliant based upon your local government’s regulations, the next decision is whether or not to grow using seeds or clones. To give you a short summary of the difference, seeds are exactly as they sound. They are the seeds of hemp plants that you would plant into the ground and hope that they develop. Clones are baby hemp plants roughly 2-3 inches in height. They have sprouted from the seed form.
Planting Hemp Seeds
Here are some things to consider with seeds. Seeds tend to cost less. That lower-cost brings an element of the unknown because you won’t actually know if that plant takes root and starts to sprout. Traditionally some seeds flat-out won’t survive and will die. The other thing to consider with seeds is that you have a higher likelihood of getting a mix of male and female seeds. This is a concern due to the risk of cross-pollination.
When male and female hemp plants start pollinating with each other, you are at risk of the THC levels escalating beyond legal limits (.03% THC is the legal limit per the 2018 Farm Bill). Most farmers today suggest only planting female hemp plants to avoid this issue.
With seeds, you are also going to need to plant earlier in the season. Therefore, depending on the weather, you will have a variable to consider when it comes to frost or growing conditions. You have to be ready to plant sooner in the season if you’re planting seeds.
Planting Hemp Clones
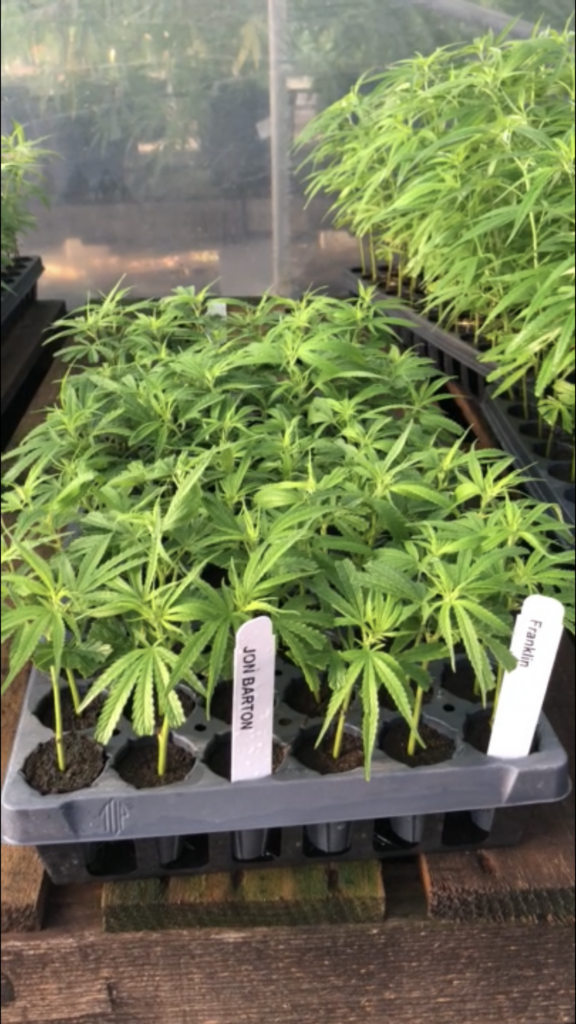
Conversely, clones will cost more than seeds. However, clones tend to have a higher survival rate as you are buying mature plants that have already sprouted. Typically they will be at least one to three inches, depending on your vendor. The other thing to consider with hemp clones is that you can plant later in the season. I bought clones for my little farmland.
I went with clones because for the most important reason. I was a novice when it came to growing anything. Literally, my houseplants have a survival period of typically 2 months. I was not confident in my ability to identify the males from the females. I was not excited about the workload of monitoring my plants, looking for the males to remove (to prevent pollination). The last thing I wanted to do was to have a crop that I had to destroy because my plants cross-pollinated with each other, becoming “hot”. That’s the industry term for hemp that tests higher than the legal THC percentage.
The other reason I went with clones was because of a later planting period. In Tennessee this means mid-June. Also, my growing area was not going to be ready until June. I had a wonderfully helpful experience with my clones and purchased from Wolf River Growers in Pall Mall, TN.
Selecting Hemp Varietals for Farming
For the novice, you may be surprised to learn that industrial hemp comes in many varieties. Just like apples have many different varieties ranging from Granny Smith to Pink Ladies to Fuji, hemp also is diverse. There are a couple of things that you’re going to want to consider when choosing your varietal.
- Number one, make sure that the varietal of hemp that you’re choosing is suited for your growing zone. Certain hemp that works very well in the scorching heat of Tennessee is not necessarily going to be great growing in Colorado or Michigan. One of the best places to search for vendors of the varieties that grow in your region would be to check with your state. Most states nowadays have certified seed and clone sellers that are authorized to sell hemp in your local state. Do be warned that there are plenty of hemp seed and clone providers online. Keep in mind that they are excellent at marketing and may not be educated on what varietal is required for successful growing in your region. Again, my suggestion would be to check with your state to see if they have an authorized sellers list.
- The second thing to consider when choosing your hemp varietal is your end purpose. Hemp is highly diverse in uses. As you probably know by now hemp can be used for anything from medicinal purposes associated with CBD all the way up to hempcrete in the housing industry. Hemp’s fiber structure makes it more appealing in packaging too! Do your research and find out what varietal of hemp is going to work the best for your end goal. Since I wanted to grow hemp for CBD, I looked at varietals that were suited for growing hemp in the high summer heat of Tennessee as well as producing the highest CBD percentage. Due to the popular demand of growing hemp I wasn’t able to get the highest CBD that I was looking for, but I was able to find a very adequate one using the Franklin varietal from Wolf River Growers.
Within CBD focused hemp, you may also want to consider how you want that CBD to be used. For example, the Franklin varietal that I grew is really good for smokable hemp. Do consider how you’re going to be using that CBD. If you’re going to be using it for CBD infused edibles or CBD oil in a liquid form then you may want to consider that in your research.
Now that you have the stage of the hemp plant that you will be planting, you will have to schedule a time to go pick them up. If you’re anything like me you’re going to have to wait for the seeds to turn into clones. It’s important to note that with the increase in growing hemp, you want to plan on securing a vendor and submitting your order 3-5 months out from your planting period.
Prepping the Land by Testing Your Soil
While you are waiting for your clones to be ready, one of the things you should be doing is prepping the land. First, get a soil sample because it will give you an idea of what nutrients you want to add to your land to maximize your yield of hemp. This can be done by looking at your local agriculture center’s recommendation on how to perform a soil sample.
After getting your soil sample, you will need to bring your soil into a certified soil testing site or mail it to a testing center. For me, I dropped my sample off at our state’s agricultural department because it is less than 2 miles from my house in the Ellington Agricultural Center. After submitting your sample you should expect to wait anywhere from 10 to 20 business days to receive the results of your soil sample.
Tear up the Land if Needed (I Did)
Since I decided to grow industrial hemp in my near downtown backyard, I had a yard filled with a typical blend of fescue grass, bermudagrass, and lawn weeds. This created a very strong layer of grass on top of the soil I needed to till up. Now the reason I chose to till the land was that the soil could be rotated, turned, and suitable for planting. Keep in mind that if your planting area is filled with weeds and grass you may find that they overtake your newly planted clones. If you want to minimize weeds choking out your newly planted hemp, I suggest removing the layer of sod and tilling the dirt.
I rented a tiller from Home Depot. The first tiller was a mistake because it was not designed for tearing up the grass. The first tiller I got was designed for freshening up a garden that had already been removed of its soil.
After fruitlessly attempting to till my backyard with an inferior tiller, I ended up returning it to Home Depot within an hour. Since this was my first time planting anything in my backyard on this scale I needed to go with a bigger tiller. That is one lesson I would say I took from this hemp experience.
Pay extra for the right tools! I paid more because I tried to cut corners with a cheaper tiller. Getting the right tool, in the beginning, would have saved me money.
I ended up renting a high-level tiller. Full disclosure, even after renting a more powerful tiller I still wish I would have rented the top of the line because it would have gone even faster. With that being said, I did have a very useful tiller and it still took me probably 12 hours to till less than a tenth of an acre. It was by far the most brutal part of this whole farming experience. My forearms burned, the temperature was well into the hundreds with the extremely high Tennessee humidity, and relentless sun.
Another option that would have saved me a heck of a lot of time would have been to just get a bulldozer sled and scrape off the top lower layer of sod. The challenge with doing that option is of course finances. It does cost a lot of money to rent a skid. However, if I could do it all over again I would have definitely spent the extra money renting a skid to remove the top layer.
If you have a Home Depot in your area, here is a quick link to renting a skid. Be sure to change the location to match your local store. If you have a trailer, you can get a skid for a reasonable price. It’s the delivery that ups the charges.
Here is after my final effort with a larger tiller after. I had finally completed it. Notice the defeat in my eyes…
Prep with Proper Nutrients – Nitrogen, Phosphate, Magnesium
For this next step of growing your own urban hemp farm, you want to have your soil analysis. Depending on what soil test you bought, your analysis will tell you the proper nutrient ratio that grows hemp to its maximum size. In the state of Tennessee, at the time I received my test, we did not have a specific ratio for hemp. The standard recommendation at the time was to treat hemp’s ideal soil properties to what would be used for corn.
When I had received my soil test results, it was similar to what I would need for growing hemp. I was not really concerned about having an exact ratio, just close enough. That played a role in terms of what I did next. A great time-saver is just to purchase a hemp fertilizer (hemp dress). I ended up purchasing from a local garden store.
This may not have been the most perfect way to do it if you are doing this on a large scale. For me, it was the most time-efficient as I have a lot of other things going on in my life outside of growing hemp. I paid about $55 for a 5-pound bucket and I ended up just spreading the fertilizer over the soil.
After spreading it, be sure to water over the hemp dress to make sure it is absorbed into the soil and to avoid run off. A more efficient and effective way would have been to till the hemp fertilizer directly into the soil during the tilling. I didn’t really have time to do that and did not want to rent a tiller again.
Becoming Compliant to Grow Hemp
If you think that you can just pick up some hemp seeds or some hemp clones and place them in your backyard, you are most likely mistaken. While hemp farming has become drastically more acceptable in more states in our country, it often comes with many regulations. There is still an unwarranted fear from many politicians when it comes to industrial hemp. Since most of their legislators have a particular view on the cannabis plant, industrial hemp often is categorized with marijuana. Therefore many states put strenuous burdens on those that are growing hemp.
For example, many states require you to get a license. For the state of Tennessee, in the beginning, there was an open enrollment period for getting a license. With the huge demand and interest in industrial hemp, in addition to the state of Tennessee wanting to be a leader in growing hemp, when I last looked it appeared that now you can apply for a hemp farming license anytime during the year.
When I submitted my request for a hemp license, I needed to have the exact GPS coordinates printed out and submit it with my application. In addition, I had to submit a satellite image of my property with the exact outline and highlight the growing space. If you are growing in the state of TN, here is a quick link to the application along with current fees and required documents.
Be sure to check with your local and state governments to find out what is required to grow in your area. Keep in mind that this is often just to get started. At this point you typically do not have any hemp that you are legally able to buy. Most states require you to have your growing permit before actually picking up your hemp. It is best to get your license at least 6 months before you want to plant.
Often, you will need to get a moving permit when transferring your seeds or clones at any time. More on that later.
Also in terms of preparation for planting, your state may require additional security measures. In Tennessee, I had to fence off my growing location. To keep costs down (and I was not sure if I was going to grow the following year) I used 6-foot deer netting around the entire perimeter of the growing plot. To keep the fence from falling over, I used 6-foot plastic stakes spaced about 8 feet apart. This provided a layer of protection from snooping parties and wild animals.
I was required to install security cameras to monitor my growing area. I installed two security cameras from Blink.
I was not that impressed with Blink cameras. The price was good, but there were limitations with clarity during the night as well as the durability during the hot summer days in Tennessee. If it was something I was doing on a bigger scale, I would have definitely gone with a better and more expensive security camera system. In Blink’s defense, they are designed for inside the home and porches.
One of the things I did to limit any potential visits from the local police was to notify them. I called my local police department and let them know that I had a license to grow industrial hemp, my grower license number, my street address, and my phone number if they had any questions. I stressed it was industrial hemp with less than .3% THC. I also assured them that it was legal and that I could submit a copy of my license to them if they would like.
In my whole time of growing (5 months), never once did I have a police officer come to my house. I do live in a high-traffic area with many homes close by. I had no issues.
Transportation
Depending on what stage of the plant that you’re going to be putting into the ground determines when you can start planting. If you are planting seeds, you need to plant earlier in the season. In a southern region state, like Tennessee, you want the seeds in the ground sometime in mid to late April. By using clones I was able to plant around June 15th. Be sure to check with local growers to find out when planting season is best for your area.
Also, check with your state to see what paperwork is required when transporting your seeds or clones. For Tennessee I needed to register the location and date of my pickup. I needed to keep those transportation papers on me from the moment I left my house until I returned back home. To the uneducated person, hemp plants do look like marijuana plants. If you get pulled over without the proper documentation that your state requires, don’t be surprised if you end up having all your clones and seeds seized or even face stronger criminal punishments.
Planting Your Hemp Clones or Seeds
Previously most of the things I have shared help lay the groundwork for your planting season. The common saying “if you fail to plan, you plan to fail” is very relevant in planting. If you take the steps that are outlined earlier, it should help with the maximization of your crop. Let’s assume that you’ve done everything that has already been mentioned. Now comes the fun part.
Let’s assume that you have received your seeds or clones. One very important thing that I learned from the great people at Wolf River Growers is to harden your plants. If you are new to planting, the term hardening may be new. Hardening is similar to taking a domesticated animal and slowly integrating it into the wild. If you’re planting clones, for the most part, they have been grown in an ideal, perfect environment. They were probably grown in a greenhouse. They were misted at exact times and strategically exposed to the right amount of sunlight. These are highly pampered plants!
Hardening is going to help transition these indoor plants to hardened tough outdoor plants. A general routine to harden your hemp plants for outdoors is:
- Day 1 allow your clones an hour of direct sunlight the first day.
- Day 2 expose them to direct sunlight for 2 and a half hours.
- Day 3 expose them to three and a half hours of direct sunlight.
- Day 4 expose them to 5 hours of direct sunlight before bringing them out of the sun.
- Day 5-7 are the days before planting. It’s up to you on how many days you choose between 5 and 7. Expose your clones to seven or eight hours of direct sunlight during these days. During this whole time water them to keep the soil lightly damp. Do not overwater them because the roots may rot!
After you’ve successfully hardened your plants for 5 to 7 days, now comes the fun part, planting!
Planting your Hemp Clones
Most of your varietals will require planting five to six feet apart from each other for adequate airflow between the fully grown branches. If you are growing in an urban setting where your space is less than 2 acres then I would recommend you maximize your spacing by using a triangle spacing method. Here is a quick mathematical look at how triangle plant spacing allows you to plant more in the same space.
To find out how many plants you can maximize in your space, here is a calculator to determine the number of plants you can grow in a certain area based upon a spacing method of 6-feet apart.
For my property, I had about 2200 square feet of growing space. With a spacing of 72 inches apart, it was calculated that I would be able to grow 61 plants using square plant spacing or 70 plants using the triangle plant spacing method. If you are looking to maximize your space, I highly recommend planting the triangle spacing method. That’s what I chose.
After you have identified the spots that you’re planting each clone, next comes the digging. When planting your clones in the ground, you want to plant them deep enough so the top of the soil in the clone tray is flush with the ground. I mixed a soil blend with the soil that was in the ground to help with nourishing and providing nutrients to the plant as I planted my clones.
It’s actually a mixture that is very similar to what the clones are in when in the trays. One thing I did wrong that led to issues down the road was not firmly packing the soil around the plants when I planted them. Sadly, I was concerned about overpacking the soil around the plants and I ended up under packing. This caused many of my plants to tip over and turn sideways as they grew over 2 feet because their root structures weren’t strong enough.
Be sure to pack your clones firmly into the ground with the soil.
After planting, water your plants. Your watering time will depend on your growing region. Hotter regions will require more water than cooler climates. Remember, you do not want to overwater as it could cause root rot. One of the misconceptions about hemp plants is that since it’s a weed it doesn’t need water. While it may not need as much water as other crops, by you adequately watering your crop it will give you a greater yield.
A side note to recall when planting your clones. They are delicate. Handle with care! Unfortunately, I was careless on a couple of clones and accidentally snapped their stalks. In my experience, if the hemp clone snaps, you’re not getting it back. Both of mine died :(.
Your first few weeks are going to be tense as you check on your baby plants, yearning for them to grow successfully. Take comfort knowing that these plants are pretty resilient. Within two weeks of planting, we experienced large scale flooding in Nashville. A third of my crop was completely underwater for over 30 minutes because of intense rain. I planted my hemp on a slight slope in my backyard and the erosion from the pounding rainfall was a challenge. I had to divert the raging water from destroying all my hemp.
Unfortunately, due to flooding and overwatering I killed an additional two plants. The roots were too soggy and they never recovered.
Irrigation and Automation Systems for Farming Hemp
When I first started my journey of exploring growing industrial hemp in an urban setting, I got great advice from some people in Tennessee to get an irrigation system. I really thought with a small piece of land that it would be wasteful and costly to have an irrigation system. I was wrong! A week after navigating my hose around the fencing and stretching the hose as far as it could go, I was frustrated.
I was filling up buckets of water to water plants that the hose could not reach. Every morning and every night I was bringing the hose back in and back out. I would spend 30-60 seconds personally watering each plant. I did this multiple times a day and was wasting time.
Eventually, I got a Rain Bird drip irrigation system that was highly recommended to me by many people who do grow industrial hemp on a larger scale. Rain Bird is a very popular irrigation system. I can go on and on about the reasons as to why you want to use an irrigation system, specifically drip irrigation. For concise purposes, I will just share with you what I did and also what the benefits were.
As of this writing, you can get it on their website for $26.52. It’s a basic system that has a connection point to put directly onto your home’s outside spicket. The starter system also includes different attachments that will create different watering methods from sprinkle effects all the way to a direct stream. I didn’t use any of the sprinkler adapters from the Rain Bird starter system. The main thing I was looking for was the connection points as well as the main tubing.
The starter system didn’t reach far enough to irrigate my entire property so I had to add a few more purchases. I purchased an additional half-inch piping with a connection adapter that connects to the starter system’s main pipeline. I also purchased a repair kit with quarter-inch piping that would allow me to branch off from the main pipeline to target each plant. Imagine central piping that wove its way between all of my plants with vines branching off from the main piping directly near the base of my plants. I did this to minimize my water consumption and maximize the water to each plant.
I also purchased the quarter-inch piping repair kit for a drip regulator that you can connect to help regulate water flow to the plants. The drip regulators that I used ranged from 1/10 gallon per hour to 2 gallons per hour. I used the 1/10 gallon regulators in the more shaded areas and the 2-gallon regulators in the full sun areas. I recommend regulators to help calculate how much water you’re giving your plants and determine how long you need to water for.
Some additional purchases I made included more water emitters (drip regulators), stakes for propping up the quarter-inch piping. The stakes that I bought include bug and dirt guards to keep the piping free of debris and clogging.
The final piece of the puzzle that I would highly highly recommend to anyone who values their time is to get an automated water timer. I bought the Rainbird water timer and my goodness this was a lifesaver. Set the time to water when you want and keep your hose turned on. At the specific time that you designate, the water timer will release the water flow into the piping.
This means that you can be on vacation for a week and come back home knowing that all your plants have been watered multiple times a day or one time a day depending on however you set it. After the set time, the water timer seals the water flow, turning off your water and preventing water waste.
Weeding and Caring for your Hemp Plants
If you recall I completely removed the top layer of sod and tilled the land. This created a big vacant space of dirt in my backyard. Over time the weeds started creeping back. To control the spread of weeds, every day or every other day I pulled weeds from around the hemp plants. I focused on a foot radius around the stalk.
I also mowed between my hemp to keep the weeds from growing out of control, being careful not to hit my irrigation system. I didn’t want to risk the plants getting choked out by the weeds. It was very laborious. In many states, the use of weed killers on or near hemp is not allowed on or extremely risky to your hemp due to it being a bioaccumulator as previously mentioned.
Pests
The use of pesticides and herbicides are not allowed on industrial hemp. This creates complete vulnerability to pests. Nearly two months into the growing season I got hit by an attack of aphids. That link will give you a better perspective on what aphids are. The short story is that they’re pests that will destroy your plants by sucking out their nutrients.
I was able to know that I had an aphid issue because I noticed all of these black and red larvae-like bugs on my hemp. Found out they were ladybugs in the larva stage. Also found out that ladybugs are predators to aphids. The research mentioned looking underneath my leaves and sure enough there were waves of white sticky looking bugs; aphids.
Getting rid of aphids proved difficult. I bought a lot of the fruit and vegetable soaps that you will find on the previous link about how to get rid of aphids. It’s a delicate balance getting rid of the aphids without killing the plant. The short story is that a lot of the natural ways to get rid of these pests are soaps.
The challenge with the soaps is that they can clog the pores of the plants causing damage to the plants and in some cases death. But if you put too little soap on the plants then you’re going to miss getting all the aphids. And since they reproduce quite quickly, they can still kill your plant if you apply too little.
Sadly, six to eight of my plants died from the aphid attack. Luckily I was able to control the outbreak before it spread to every plant. That left me with about 66 hemp plants.
Walk Your Hemp Farm Often
At this stage of your growing season, it is a lot of rinse and repeat. It’s a lot of sunlight. It’s a lot of walking your farmland. I highly recommend walking your crops at least once every other day. If you are anything like me you will really enjoy seeing your crop begin to grow. Another benefit of walking your hemp farm is becoming familiar with potential problems (think aphids, not enough water, fungus, etc). The reason my aphid issue was bad is because I went on vacation for a week and returned to an outbreak. That was a reminder to walk my hemp farm to become familiar with potential issues.
Harvesting Your Hemp AKA “Croptober”
Harvesting is often thought of in the farming world as the moment that all your hard work pays off. What I learned is that harvesting is actually another step that you need to be incredibly precise with. Everybody wants to maximize their yield. Meaning that we want our crops to grow as big and abundant as possible. For me I wanted the most CBD to be gained from these plants. I wanted them to be as big as possible.
When it comes to harvesting though, if you grow them too big and too long you risk your plants rotting and dying. For the varietal that I planted, Franklin, the harvest season in Tennessee allowed it to be towards the end of October and possibly even spill into November. For simplicity’s sake, I’m going to define harvesting as cutting down your plants. There is a drying phase but I’ll cover that later.
Harvesting was pretty simple since I only had 66 hemp plants left. I used a pair of tree clippers and cut the stalks as low to the ground as possible. One of the most important things to consider when harvesting is the weather. Typically you want the weather to be extremely sunny with absolutely no rain. You’re going to cut these plants down and will need time to pick them up. They’re going to be laying on the ground without their life source (the stem). This is going to make them ripe for rotting if there’s too much moisture in the air and on the ground.
I harvested in late October. The rationale was because of a predicted 6 days of pure Sun followed by a predicted rainy cold front for 5 days. Also in Tennessee, the sun sets pretty early in the day and I wanted to maximize the exposure to the sun while my plants laid on the ground.
Drying Your Hemp
There are two routes that you can choose when drying your harvest. The first route would be drying in the field. This is what I did. This is where you cut your crops down and you would let the sun air dry your crops for you. The positive to this is that it is the most affordable way to dry your hemp. The downside to this is the unknown elements. You’re at risk of your crop rotting, rain, fluctuations in humidity, temperature, or bad weather. You’re also minimizing airflow on the bottom of the hemp. To combat this, rotate if the weather gives you enough time.
The second route is using a third party drying facility or creating your own drying building. The downside of this route is pretty obvious. You’re going to increase your operating expenses. It could be worth it if you’re doing this on a large scale or if you’re planning on growing industrial hemp on a long-term basis. The massive upside of a professional drying building is the environmental control. You will be able to monitor temperature, protect your crops from the weather, and minimize contact with bugs. Some things to think about that will add to the cost will be the need to create the structure, add drying racks to lay your hemp on (adequately spaced apart to create airflow), and heaters with humidifiers to keep the air dry while heating the room. Be sure to calculate those additional costs.
I ended up leaving my crops in the field for two days. The weather had changed. The rain started coming earlier than anticipated. I put 66 plants on my covered back porch. Needless to say the hemp was stacked 5 ft tall in some places and there was just a narrow walkway to get from the stairs to the back door. This took enormous patience from my wife. Having a back porch completely filled with hemp was her least favorite part of this journey. I left the hemp drying on the back porch November until February. It was around this time that I was resigned to the fact I wasn’t going to sell my crop to a processor or business. At this point in the season, TN processors were not accepting any size less than 1 acre.
What to do With Your Crop
After drying comes de-budding (removing the flower from the stem). A great way to tell if your plants are fully matured is if they fall off the plant quite easily. My varietal had a strong, almost woody stalk with branches. I was able to easily snap those branches when my hemp was dry. Also, your flower will be delicate with sticky crystals. If your purpose for growing industrial hemp is for personal use you can be a little bit more assertive with the removal of the flowers.
One of the fastest ways to de-bud is to get a big bucket or trash can and grab the branches by the part that was connected to the stem. Hang the stem upside down, and put your thumb and pointer finger firmly on the base of the branch that has the flower on it, and firmly move your fingers down the branch removing the bud into the basket. You can be this efficient if you’re selling your biomass to a processing plant.
However, if you are selling your flower to smoke shops then you do want to be more delicate as many people are going to buy based upon the look of your flower. If this is the case, use trimming scissors to delicately snip your flower buds. Be careful to not crush the flower.
I decided to use mine for personal use and to share with friends and family. I’ve used mine as smokable hemp and most recently as tea. A buddy of mine who has undergone multiple shoulder surgeries for an injury was the one that turned me on to steeping the hemp flower into tea. He called me raving about how great his shoulder felt. Up until that point I really never heard of anybody using hemp as tea. Who knows, maybe I opened up an entirely new market for him.
If you grow hemp to be processed into CBD isolate, there are many vendors available for you through a simple Google search.
What I Learned and What’s Next
What did I learn? I learned at a basic level how to farm. I learned that today’s farmers have developed an incredible refined system through an enormous amount of trial and error. I learned that I have a lot more respect for those that provide food for billions of people around the world. I learned that it pays to use good tools. Sometimes it’s just better to pay extra because of the time you save.
I also learned to appreciate the value of seeing something this tiny grow and thrive. It allowed me to connect with creation in a whole new way. I learned that I have one fantastic wife that just wants me to try things that are on my heart even when they are just absolutely ridiculous sounding.
Lastly, I learned that I am not ready to do it again this year and have decided to take this year off as I strategize on my hemp farm and what/if I would grow hemp for in the future.
So that’s my experience as a hemp farmer. What’s yours? Drop us a comment below about your hemp farming experience.